3rd Light Horse Brigade Headquarters
From Our Contribution
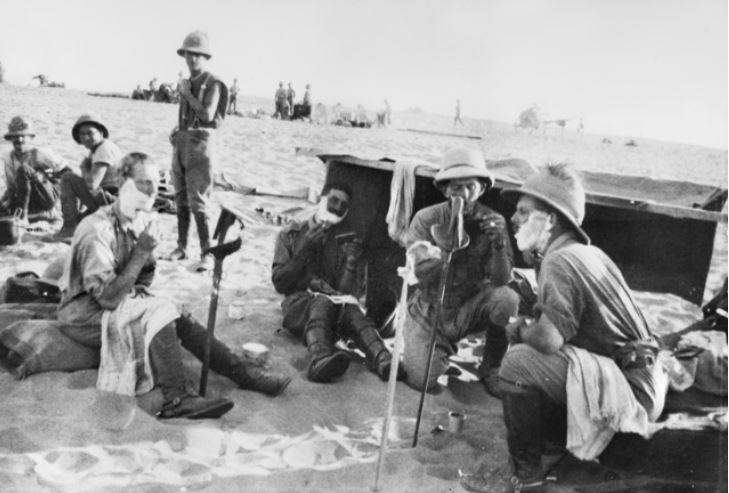
 10th LHR Officers shaving before Battle of Romani in July 1916 | |
 Shoulder patch | |
Brief History
The 3rd Light Horse Brigade was raised as part of the 3rd Contingent that was hastily put together at the beginning of October 1914. Brigade headquarters opened in Melbourne in early November, with equipment issuing, training and troop organisation beginning at Broadmeadows on 6 November. The brigade was organised into three regiments – the 8th, 9th and 10th – each consisting of approximately 520 fighting men organised into three squadrons. The 8th was recruited from Victoria, the 9th from Victoria and South Australia, and the 10th from Western Australia. These units were raised throughout September and October, and the brigade embarked for the Middle East in late 1914 and early 1915.
After arriving in Egypt in February – March 1915,[10] the brigade undertook training at Mena Camp.[4] Training focused initially on individual skills, before progressing to collective training at squadron, regimental and eventually brigade level. In mid-May 1915, the brigade was deployed to Gallipoli as reinforcements for the infantry that had landed in April. About a quarter of the strength of each light horse regiment remained in Egypt with their horses; however, additional reinforcements were provided prior to their arrival at Gallipoli, to bring them up to strength. the 8th and 10th Light Horse Regiments took part in the attack at the Nek on 7 August, while the 9th was placed in reserve.[7][8][9] Planned as a feint to draw attention away from efforts elsewhere, the attack proved costly for the light horsemen. otal casualties in the two regiments amounted 234 killed and 138 wounded. By mid-December all three regiments were withdrawn from the peninsula, as part of the general withdrawal that followed the decision to abandon the position.
In the early part of 1916, the brigade was employed in a defensive capacity to prevent an Ottoman attack on the Suez Canal, working to the east of the canal. Following the defeat of the Ottoman attempt to capture the Suez Canal, the 3rd Brigade was involved in actions designed to push the enemy forces out of the Sinai with mixed success - Battles of Bir el Abd, Maghdaba, and Rafa. During 1917 two unsuccessful attempts to capture Gaza were followed by success at Beersheba, followed by third time 'lucky' at Gaza. The Brigade played a role in the capture of Jerusalem on 30 Dec 1917. Following a period of rest, they advanced towards the Jordan River and took place in the raid on Es Salt which they held until they were ordered to withdraw on 3 May 1918.
Resting in the Jordan valley they trained for a role as cavalry, while many fell ill to a range of diseases including malaria. Finally in September they participated in the north up the coast towards Damascus, participating inthe Battles of Megiddo and Sharon, the capture of Jenin, Tiberias and finally Damascus where they remained until late October 1918 before begining an advance on Homs. However, the Ottoman's surrendered on 30 October. Occupation duties at Tripoli followed before they returned to Egypt in early 1919 where individual regiments were used to quell unrest during the Egyptian revolt which began in March. In late June 1919 they were withdrawn to Moascar to prepare for embarkation for Australia..
During World War I, the 3rd Light Horse Brigade consisted of the following units:
- 3rd Brigade Headquarters
- William Henry Shade 23 Nov 1916 - 7 Jan 1917
- George Ezra Bunney late May 1918 20 May 1919
- 8th Light Horse Regiment
- 9th Light Horse Regiment
- 3rd Light Horse Brigade Signal Troop
- Walter Cattach 10 Dec 1916 ?? Jun 1918
- 3rd Light Horse Brigade Train
- 8th Mobile Veterinary Section
- 1/1st Inverness-shire Battery (from the British IV Brigade, Royal Horse Artillery (T.F.)) (1916–1917)
- 1/1 Nottingham Battery (from the XIX Brigade, Royal Horse Artillery (T.F.)) (1917–1919)
- 3rd Light Horse Training Regiment
- 3rd Light Horse Double Squadron (1916)
- Edward James (Ted) Rouse 23 Jun - 22 Nov 1916
Notes